Copi Hollow – Menindee Lookout & Kinchega NP River Drive

Copi Hollow – Menindee Lookout & Kinchega NP River Drive

Copi Hollow – Menindee Lookout & Kinchega NP River Drive

Had a fun day today. Went for a drive to a place called Copi Hollow for a look around. It’s a water skiing park near Lake Pamamaroo. Not much water skiing going on the moment though due to a lack of water.

Driving Out To Copi Hollow

Driving Out To Copi Hollow

Next we went to Lake Menindee lookout. The lake is as dry as anything, more like a depression in the desert than a lake but it was still extremely interesting to see.

Menindee Lake From The Lookout

Menindee Lake From The Lookout

We had to cross the railway tracks and on the way back we had to wait for ages while a freight train took quite a few minutes to rumble by.

Freight Train At Menindeee Lookout

Freight Train At Menindeee Lookout

Then we went back in to Kinchega National Park and followed the River Drive from start to finish. It’s a great drive about 30ks in length that winds along the bank of the Darling River beneath overhanging red river gums. There are a lot of very good camp sites along the river.

Darling River Kinchega National Park

Darling River Kinchega National Park

Between camp 32 and 33 you can see the remains of the boiler from a paddle steamer that exploded after running dry back in 1872. The chinese cook got thrown in to a tree by the explosion and wasn’t found for two days. They pulled him down and carted him off for medical assistance but the poor bugger died a bit later.

Remains Of Old Riverboat Boiler In Kinchega National Park

Remains Of Old Riverboat Boiler In Kinchega National Park

We also stopped at camp 34 which is meant to be another Burke & Wills camp site. It is certainly a magnificent spot. Back at camp we had a few beers with friends Suzi and Mark and then settled in to watch the NRL grand final on a massive projector screen. Was a great day.

Replacing Suburban Hot Water Anode In A Supreme Getaway

Replacing Suburban Hot Water Anode In A Supreme Getaway

Replacing Suburban Hot Water Anode In A Supreme Getaway

The Suburban Hot Water Anode in your caravan is a replaceable item. I will show you how to inspect and replace step by step. It’s an easy thing to do and it has to be done regularly.

What Is The Anode For Anyway?1. Tools & Replacement Anode2. Disconnect Water & Open A Hot Water Tap4. Place A Bucket To Catch The Water That Will Drain From Your Tank5. Remove The Anode6. Inspect Removed Anode & Determine If It Needs Replacement7. Rinse The Tank Out8. Thread Tape9. Install Suburban Hot Water Anode & Turn The Water Back On

What Is The Anode For Anyway?

The anode in the hot water heater in your caravan is actually meant to corrode away over time. Anodes are made from magnesium and they protect steel by a sacrificial electrochemical action. Magnesium is electro-negative relative to steel. When a magnesium rod is fitted to a steel tank filled with fresh water, a current will constantly flow through the water between the rod and any exposed steel area on the tank wall. The circuit is completed through the tank back to the magnesium rod. This protective current is produced by the magnesium releasing ions and this results in corrosion in the anodic area. A magnesium (the anode) corrodes instead of the steel tank (the cathode). This principle of electrolytic corrosion control is called cathodic protection. Because cathodic surfaces cannot rust, the steel tank is protected.

So now that we know a bit about anodes, let’s replace one. I generally check the anode every six months or so. It won’t usually need replacing this often, but it’s easy to check so I do.

Step 1 – Tools & Replacement Anode

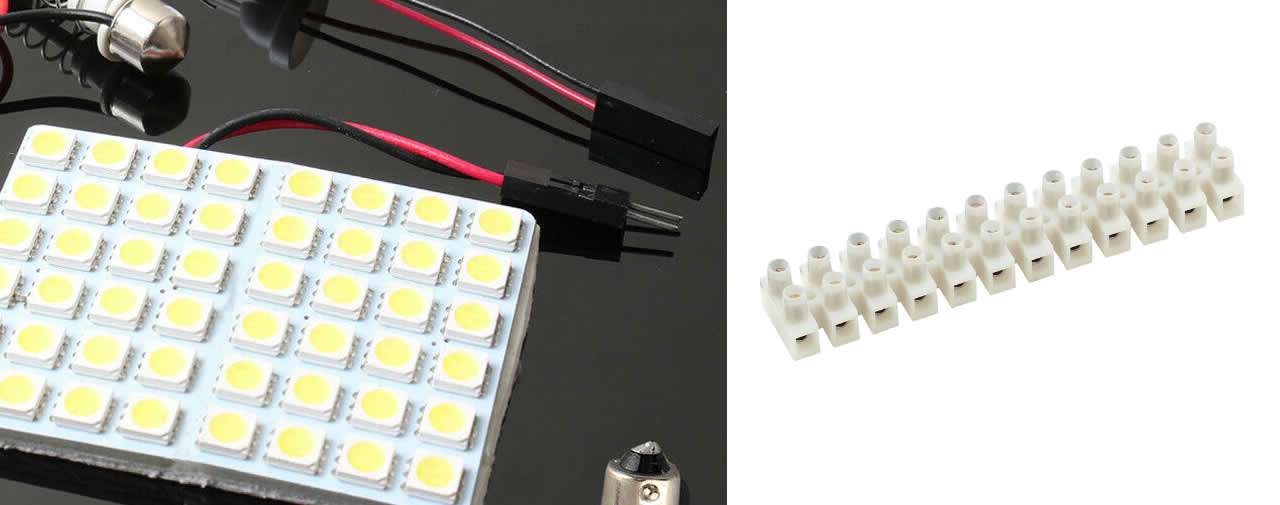
The photo below shows all of the bits and pieces you will need to do the job. You don’t necessarily need the tank rinser, a hose with a decent nozzle will do an ok job but I reckon the rinser gets in to the corners and top front of the tank better. Same with the multi-fit tube spanner, if you have the correct size socket (11/16″) you can use that instead. Replacement anodes, the rinser and removal tool can all be bought online from any of the caravan spares places or sourced from any caravan shop.

Items Needed To Replace Suburban Hot Water Heater Anode

Step 2 – Disconnect Water & Open A Hot Water Tap

Before you get started you need to do a few things. Make sure your van isn’t connected to mains water, turn off your water pump and open the hot water tap to relieve any pressure in the system. If you haven’t got a pump isolater switch then just disconnect the 12v system.

Step 3 – Open The Cover To Your Suburban Hot Water Heater

Next you want to open the cover that protects your hot water heater. They’re pretty much all the same. Pull on the little toggle then turn it until it lines up with the slot and then simply lower the flap.

Replacing A Suburban Hot Water Anode Open The Cover

Replacing A Suburban Hot Water Anode Open The Cover

Step 4 – Place A Bucket To Catch The Water That Will Drain From Your Tank

A couple of tips. Make sure the water in the tank is cold as it is going to all run out. Put a bucket underneath it, about 50% of the water will go in to the bucket, the rest will just go everywhere. It’s a good idea to do it in your driveway rather than inside of your garage.

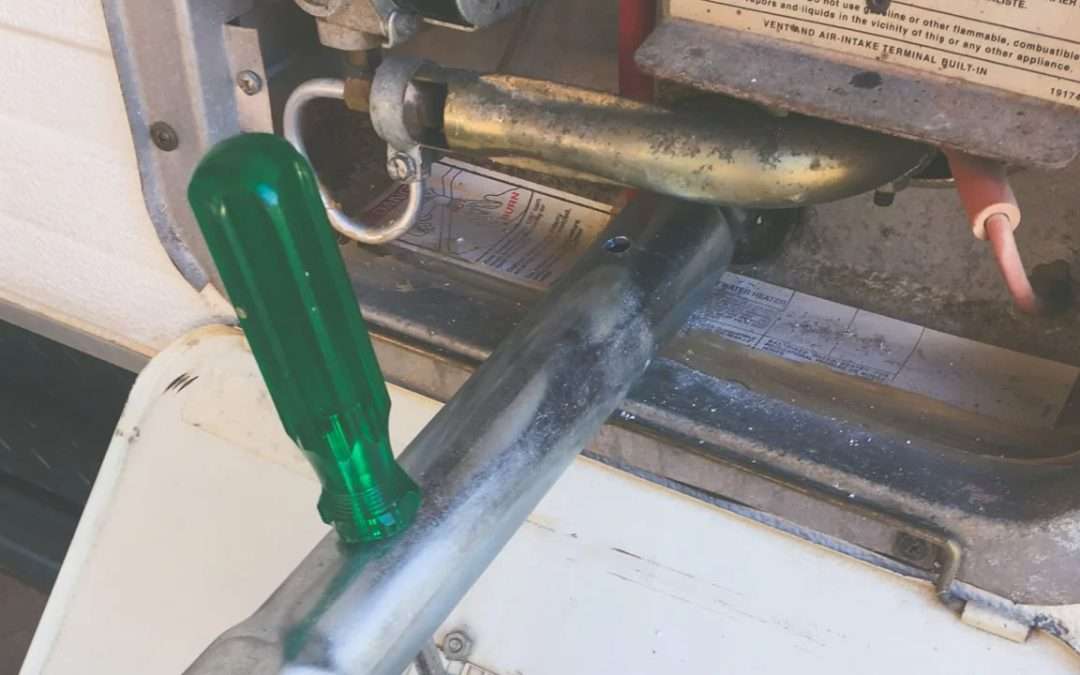
Step 5 – Remove The Anode

With the cover open you should be able to see the end of the anode. It will be down towards the bottom of the unit. Fit the multi-fit tube spanner and put a screwdriver or something similar through the holes in the tool to give you a bit of leverage. Turn the tool counter-clockwise and the anode will unscrew.

Closeup Of Anode And Removal Tool

Closeup Of Anode And Removal Tool

Step 6 – Inspect Removed Anode & Determine If It Needs Replacement

Once you have removed the anode have a good look at it. If it’s in pretty good condition like mine was it’s perfectly ok to re-use it. I replace mine if they are more than about 50% gone. The life you get out of them depends a bit on the quality of the water you have been using. If you are mostly using city tap water then they seem to last for well over 12 months. If you are using bore water from out bush they can be gone inside of three months. If you are using poor quality water it pays to check your anode more often.

Note the new anode is longer than the old one in the photo below. The replacement is a multi fit one – not specific to the 20 litre Suburban hot water heater. It fits fine, you just need to trim about 3cm off the end of it with a hacksaw before installing.

Old And New Anodes For Comparison

Old And New Anodes For Comparison

Step 7 – Rinse The Tank Out

Now you need to rinse all of the old bits and pieces of anode out of the tank. I use a rinsing tool as I find it does a better job than just a hose nozzle. That being said I used the hose nozzle for ages before buying the rinser thing. Work it in and out and turn it around to get up in the corners both front and back and top and bottom. Keep on going until the water runs perfectly clear. When the water is running clear squirt a bit of water around to clean up the bottom of the tank recess and also the tank cover. Wash down the side of your van while you are at it.

Rinsing Out The Tank With Rinsing Tool

Rinsing Out The Tank With Rinsing Tool

Step 8 – Thread Tape

Before refitting the old anode you need to remove the old thread tape. I just use a small screwdriver to lift it then unwind it with my fingers. Do this on the anode and also inside the thread on the tank. Remove as much of the old tape as you can without spending all day on it. After removing the old tape put on some fresh tape. About three or four winds around will be ample. Usually new anodes will come with tape already on them.

Remove Old Thread Tape And Replace With New

Remove Old Thread Tape And Replace With New

Step 9 – Install Suburban Hot Water Anode & Turn The Water Back On

Now you just need to insert the anode and using the multi-fit tube spanner tighten it up. Just nip it up tight, there’s no need to go overboard with the amount of torque you apply to it. After that you can close the cover. Turn off any taps that you have opened to relieve pressure in the tank and turn your water pump back on. You will hear the tank refilling. Wait until your tank has completely filled before turning the heater on to test.

John Guest Caravan Fittings Replacement

John Guest Caravan Fittings Replacement

John Guest Caravan Fittings Replacement

Last time we were away in the van one of the John Guest Caravan Fittings sprung a leak inside the cupboard underneath the sink. Luckily it was on the last morning just as we were getting ready to pack up and go home. I have installed a water pump isolating switch underneath one of the seats so I just turned it off before too much leaked out. It’s a good thing it didn’t happen during the night as quite a bit came out.

It was a pretty good leak. We dried everything up with some towels and once back home we put a couple of those moisture camel things in the van. Luckily no damage was done and it all dried out well.

It Was The Fitting On The Hot Water Pipe To The Sink That Failed

It Was The Fitting On The Hot Water Pipe To The Sink That Failed

To test if the fitting had just come loose or if the fitting had failed I removed both the hot and cold water fittings and swapped them around and then turned the water back on. This time it was the cold water pipe that had water squirting out of it so it was definitely the fitting with the problem.

Spare John Guest Plumbing Caravan

I had been meaning to get some spare fittings as I had one let go underneath the van previously so I got online and ordered up some spare elbows, tees and some straight joiners along with a few metres of pipe. I ordered all 12mm fittings after I had put my vernier callipers on one of the pipes underneath the sink to check the size. The John Guest caravan fittings come in 10mm, 12mm and 15mm sizes. It turned out I had to order a few more spare elbows as the ones I was replacing were actually 12mm on one side and 10mm on the other. Bit of a pain in the arse but not the end of the world. The fittings work out to about $5 each if you order them online. I did buy a tee from a caravan place one time because I was in a hurry for it and that cost me $15 so it’s worthwhile getting them online if you can.

Kit of John Guest Plumbing Fitting Spares

Kit of John Guest Plumbing Fitting Spares

After the fittings arrived I grabbed a couple of elbows and went out to the van. To remove the fittings it’s very easy. You just need to press down on the little collar while pulling firmly on the pipe.

Removing John Guest Fitting

Removing John Guest Fitting

After removing the fitting I noticed that one of the pipes had been cut crookedly. The pipe has to seat firmly and squarely inside of the fitting so I trimmed it to be square. I have a tubing cutter to use for this, they cost about $10 from the plumbing section in Bunnings and make getting a square cut foolproof. Failing this a good sharp Stanley knife will also do the trick provided you take more care than whoever did the original installation did! Mind you the van is eighteen year old and probably hadn’t leaked up until now so I can’t complain too much about the original installer now can I?

Pipe Needs To Be Square On The End Not Crooked Like This One

Pipe Needs To Be Square On The End Not Crooked Like This One

To install the fittings it’s as easy as pushing it on to the pipe firmly until you feel it seat home. There’s no ‘click” or anything, it just won’t go on any further. If you want to check put a pencil mark on the pipe when it’s fitted around the collar then remove the pipe and you can visually see and measure how far it is inserted.

Why Do I Think The John Guest Caravan Fitting Failed?

The fittings underneath the sink are in the cupboard where we stored a frying pan. I reckon that travelling down the road especially on some of the corrugated stuff we have been on has bounced the frying pan up in to the fittings causing damage to one of them. I am going to install a piece of 4mm marine ply underneath the fittings in the cupboard, effectively like a little shelf to prevent the frying pan being able to bounce in to the fitting again. But then again it all could have been down to the fittings being eighteen years old!


Installing LED Lights in our Supreme Getaway Caravan

Installing LED Lights in our Supreme Getaway Caravan

Installing LED Lights in our Supreme Getaway Caravan

Replacing your caravan lights with LED lights is a simple thing to do but it makes a big difference to power consumption and light brightness and colour. I replaced all of the interior and exterior 12v caravan lighting on our van with LEDs. If you’ve got a newer caravan then you probably already have LED lights instead of the old incandescent ones.

Difficulty Factor: 2/5
Time Taken: 2 hours

12v Incandescent Bulb Holder Being Removed And 12v Led Panel Installed

12v Incandescent Bulb Holder Being Removed And 12v Led Panel Installed

Big Power Saving With Caravan LED Lighting

Before replacing them I checked how many amps the old ones were drawing and it was 1.71 amps. After replacing I checked the LEDs and they were drawing 0.37 amps. Quite a saving if you have two or three lights on at the same time for about 6 hours or more a day. Particularly if you are camped up and have heavy cloud cover messing with your solar.

Old Incandescent Bulb vs New LED Output Comparison

Old Incandescent Bulb vs New LED Output Comparison

Cost Of Replacing Caravan LED Lighting

All up I replaced 5 x incandescent type globes at $5.69 a globe plus a halogen one where I had to swap the whole downlight for $24.99. Throw in $5.00 for a chocolate block connector. A tiny bit of silicone plus a handful of screws and the total cost was about $60.00.

Items Purchased Off Ebay 5050 Led 48 And Chocolate Block Connector

Items Purchased Off Ebay 5050 Led 48 And Chocolate Block Connector

Joining The LED Lighting In Existing Caravan Lights

Initially I was going to solder the connections but I figured if I ever needed to replace one the choccy block would be easier to do if on the road. The choccy blocks are held in place with a screw. The LEDs are supposed to last 50,000 hours but you never know so I have a couple of spares. The little strips came with adhesive backing however the adhesive didn’t feel that sticky to me. I have used a dab of silicone to fix them in place.

Fixed In Place With a Bit of Silicone

Fixed In Place With a Bit of Silicone

LED Lighting Light Comparison

The LEDs themselves are the 5050 cool white type, if anything they are a touch brighter than the incandescent bulbs they replaced.

Old Incandescent Bulb (left) vs New LED Output (right) Comparison

Old Incandescent Bulb (left) vs New LED Output (right) Comparison

Mars Enthusiasts 2018 NSW Muster at Wee Jasper

Mars Enthusiasts 2018 NSW Muster at Wee Jasper

Mars Enthusiasts 2018 NSW Muster at Wee Jasper

Had a great weekend camping with the crew from the Mars Enthusiasts group at Wee Jasper down near Yass. Had a heap of fun with them – they’re a really good group of people. I think Tracey Kelly added up we had 11 trailers/vans, 21 adults, 9 kids and 10 dogs. Bloody great turn out.

Beautiful Views At Billy Grace Reserve Campground Wee Jasper

Beautiful Views At Billy Grace Reserve Campground Wee Jasper

Firewood Collection & A Bit Of Exploring

Thanks go out to Sean “Big Daddy” Weaver for organising the even and to Peter Woolsey for doing all the behind the scenes stuff.

We got there early on Saturday morning and it was raining a bit. After setting everything up we went out with a few utes and some chainsaws to get some firewood for the nights big camp oven cook. Out of Billy Grace Reserve we turned left and the wood was pretty ordinary but we got a couple of ute loads of the best we could find. We probably drove maybe 10 or 15 kilometres down muddy twisty narrow tracks, it’s pretty spectacular scenery. On the way there we drove through another 3 or 4 camp grounds similar to Billy Grace Reserve that are worth checking out in the future.

Firewood Collected At Wee Jasper

Firewood Collected At Wee Jasper

Muster Night – Camp Ovens Everywhere!

Muster Night Camp Oven Cook Up

Muster Night Camp Oven Cook Up

Saturday afternoon we had a beer pong tournament. I’m rubbish at it. Dinner was great, it was cooked on the fire in camp ovens and everyone had a great feed. Took a while to get it done but it turned out great.

We also had a trivia competition, we were rubbish at that too. Afterwards we sat around for ages and talked and had a great time. Oh and at some stage of the evening for whatever god knows reason I apparently agreed to go for a swim in the river the following morning. The evening finished off for me by being the subject of the NSW Muster’s pillow talk session.

On Sunday we got up early and Amanda and Johnathon made some damper for everyone. A couple of plain ones and a couple of fruit ones, they all turned out great albeit they tool a while to cook as the coals we had available weren’t all that hot due to the dodgy wood we collected on Saturday.

A Great Day On Sunday

After breakfast it was time for my swim. It was freezing, absolutely bloody freezing but I said I’d do it so I did it. What an idiot I am! To be honest it wasn’t too bad once it was over and I got out. The creek was only about waist deep in most parts but they managed to find a deep hole so I could get in and do my swim spa thing and flop about a bit.

Cold Morning At Billy Grace Reserve Wee Jasper - Ice Everywhere!

Cold Morning At Billy Grace Reserve Wee Jasper – Ice Everywhere!

After my swim I had a nice hot shower and sat around the fire for a bit to warm up. When I had thawed out properly Simon, peter, Matthew and myself took a couple of utes and chainsaws out to get some more firewood. This time we turned right out of camp and a couple of kays down the road found a heap of nice dry gum halfway up a really steep hill. Simon and I climbed up with the chainsaws and cut a few uteloads. At one point Simon rolled down the hill a bit and tried to shishkebab himself on a branch. I was worried for a second but he was ok.

Lunch was cooked on the fire and then we all settled in for the afternoon and evening. We had a bloody great time and had heaps of laughs.

Lunch Was A Group Effort Cooked Over The Fire

Lunch Was A Group Effort Cooked Over The Fire

All up the first ever NSW Mars Muster was a huge success. We met up with some friends we already knew and made a heap of new ones. Amanda and I are really enjoying the whole muster thing and we are really looking forward to going to Menindee late September for the national one.

Graciee Loved Billy Grace Reserve Wee Jasper

Graciee Loved Billy Grace Reserve Wee Jasper

Pin It on Pinterest