How To Secure A Caravan In A Cyclone Or High Wind
How To Secure A Caravan In A Cyclone Or High Wind
Learn how to secure a caravan in a cyclone with expert tips and step-by-step guidance. Protect your caravan from high winds, flying debris, and storm damage with this essential Australian safety guide.
Cyclones and high winds are among the most destructive weather events in Australia, posing significant risks to caravans. Whether you’ve been a caravanner for twenty years or you’re a new owner, knowing how to secure your caravan during extreme weather is essential. This guide will walk you through the best practices to protect your caravan, tailored specifically for Australian conditions.
Table Of Contents
- Understanding The Risks Posed By A Caravan In A Cyclone
- How To Secure A Caravan In A Cyclone
- Best Ways To Protect A Caravan In High Winds
- Anchoring A Caravan During A Cyclone
- Tying Down A Caravan In Strong Winds
- Caravan Safety Tips For Cyclones
- How To Prepare A Caravan For A Cyclone
- Securing A Caravan Roof In High Winds
- Caravan Awning Protection In Cyclones
- Key Comparisons: Cyclone vs. High Wind Preparation
- Additional Safety Measures To Secure A Caravan In A Cyclone Or High Winds
- Long Term Preparations
- Conclusion To This Article On How To Secure A Caravan In A Cyclone Or High Wind
Understanding The Risks Posed By A Caravan In A Cyclone
Cyclones and strong winds can cause severe damage to caravans, from lifting roofs to overturning entire structures. According to insurance claims wind damage is the leading cause of caravan related losses in Australia. Cyclones bring additional hazards like flying debris, flooding, and storm surges, making preparation critical.
The Australian Bureau of Meteorology (BOM) reports that cyclones can produce wind gusts exceeding 200 km/h, which can easily displace or destroy unsecured caravans. High winds, even without a cyclone, can cause significant damage, especially if caravans are not properly anchored or tied down.
Your number one option when it comes to ways to secure a caravan in a cyclone is to leave the area. Generally speaking cyclones don’t just turn up on your doorstep overnight. In just about all cases you have a lot of advanced warning. Pay attention to news broadcasts and if there’s a cyclone heading to where you are leave well ahead of time and move well away from it’s path.
How To Secure A Caravan In A Cyclone Or High Wind
How To Secure A Caravan In A Cyclone
Securing a caravan during a cyclone requires a proactive approach. Start by positioning your caravan with its narrow end facing the wind to reduce wind resistance. This minimises the surface area exposed to the wind, making it less likely to be overturned.
Avoid parking near trees, power lines, or unstable structures that could collapse. Instead, seek natural windbreaks like hills or sturdy buildings. If you’re in a caravan park, ask the management about designated safe zones for severe weather.
Anchoring your caravan is crucial. Use ground anchors, chains, or steel cables to tie down the chassis. If no anchor points are available, dig holes under the wheels and sink angle iron posts for added stability. Cross straps diagonally over the caravan to enhance security.
Best Ways To Protect A Caravan In High Winds
High winds can be just as damaging as cyclones. To protect your caravan, always engage the handbrake and chock the wheels on both sides to prevent rolling. Wheel chocks are inexpensive but highly effective tools that can make a significant difference in keeping your caravan stationary.
Secure the roof using a strong net or straps fixed at ground level to prevent lifting. The roof is one of the most vulnerable parts of a caravan during high winds, so ensuring it’s properly secured is essential.
Remove awnings and store outdoor furniture, bikes, and other loose items inside the caravan. Flying debris can cause significant damage, so ensure everything is tied down or stored safely. If you’re unable to remove the awning, ensure it’s tightly rolled and securely fastened to the caravan.
Anchoring A Caravan During A Cyclone
Anchoring is one of the most effective ways to secure your caravan. Use heavy-duty ground anchors such as star pickets and ensure they are firmly embedded in the ground. Tie the caravan’s chassis to these anchors using strong ropes (at least 10mm in diameter), very heavy duty ratchet straps or chains.
For added stability, consider using a combination of ground anchors and wheel chocks. This dual approach can significantly reduce the risk of your caravan being displaced during extreme weather. According to SecureNT, a well-anchored caravan is far less likely to suffer damage during a cyclone or high winds.
Tying Down A Caravan In Strong Winds
Tying down your caravan properly is essential. Use high quality straps or chains to secure the chassis to ground anchors. Cross the straps diagonally over the caravan to distribute the force of the wind evenly.
Ensure the roof is also secured. A strong net or straps fixed at ground level and passing over the full length of the caravan can prevent the roof from lifting. Regularly check the straps for wear and tear, as damaged straps can fail during extreme weather.
Caravan Safety Tips For Cyclones
- Turn Off Gas and Electricity: Switch off gas supplies and unplug electrical devices to prevent leaks or short circuits.
- Elevate Electrical Devices: Place electronics on higher surfaces to protect them from potential flooding.
- Monitor Weather Updates: Regularly check forecasts and cyclone warnings from reliable sources like the Bureau of Meteorology.
- Follow Campsite Guidelines: Adhere to campsite regulations and evacuation policies during severe weather.
How To Prepare A Caravan For A Cyclone
Preparation is key to protecting your caravan. Start by removing all loose items from the exterior, including awnings and outdoor furniture. Secure the roof and chassis using ground anchors and strong straps.
Pack an emergency kit with warm clothes, essential medications, and emergency supplies. Even if your caravan is securely tied down, seek safer shelter during cyclones or extreme wind events. The Department of Fire and Emergency Services (DFES) in Western Australia recommends having a plan in place for evacuation if necessary.
Securing A Caravan Roof In High Winds
The roof is particularly vulnerable during high winds – even more so with a pop-top caravan. Use a strong net or straps fixed at ground level and passing over the full length of the caravan to prevent lifting. Ensure the straps are tightly secured and check them regularly for wear and tear.
If your caravan has a pop-top roof, ensure it’s fully lowered and securely locked in place. Pop-top roofs are more prone to wind damage so taking extra precautions with them is important.
Caravan Awning Protection In Cyclones
Awnings are highly susceptible to wind damage. Remove them as soon as high winds are predicted. If removal isn’t possible, ensure they are tightly rolled and securely fastened to the caravan.
According to Xtend Outdoors awnings can act like sails in high winds, putting immense pressure on the caravan’s structure. Removing or securing them can prevent costly damage.
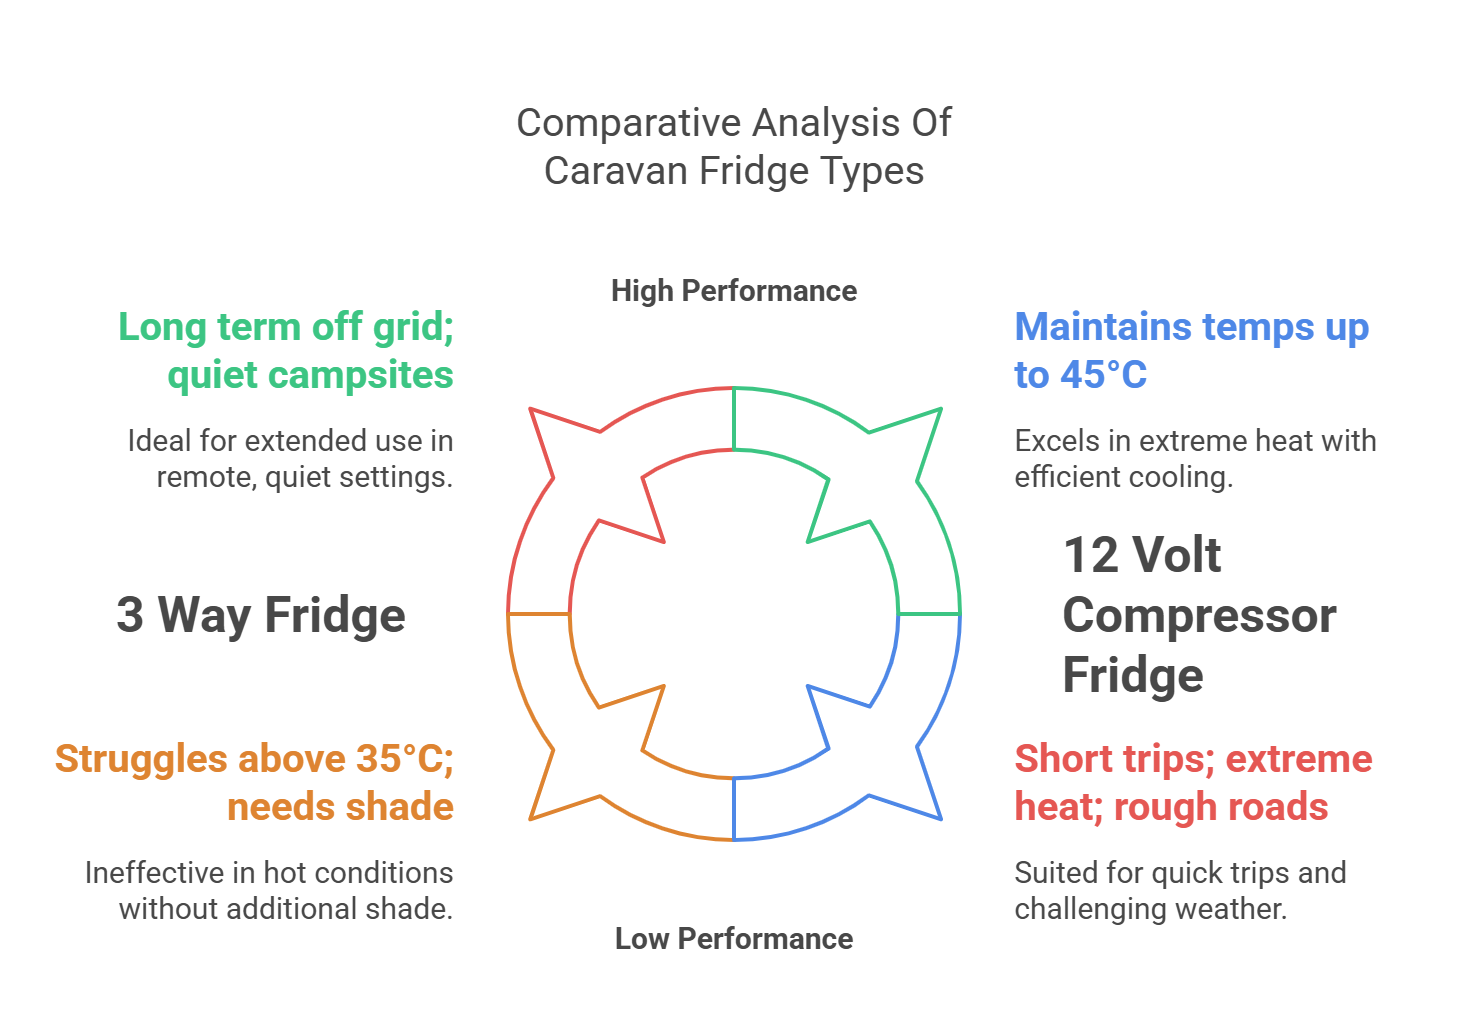
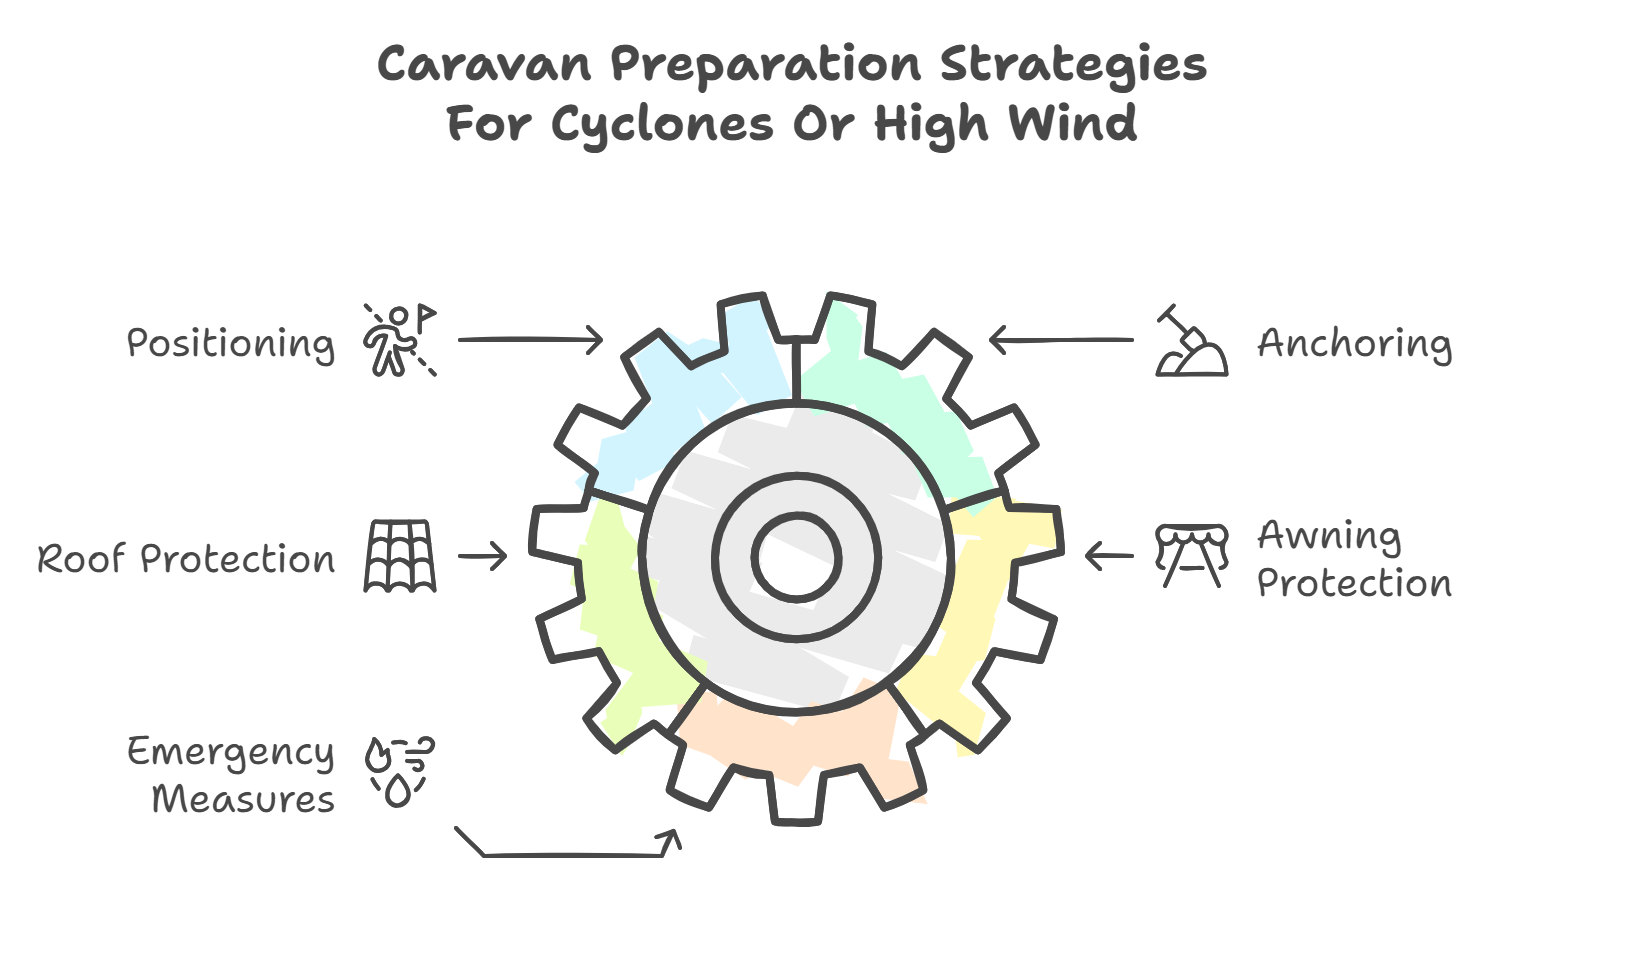
Key Comparisons: Cyclone vs. High Wind Preparation
| Aspect | Cyclone Preparation | High Wind Preparation |
|---|---|---|
| Positioning | Narrow end facing wind, seek natural windbreaks | Narrow end facing wind, avoid hazardous areas |
| Anchoring | Ground anchors, angle iron posts | Ground anchors, wheel chocks |
| Roof Protection | Strong net or straps | Strong net or straps |
| Awning Protection | Remove awnings | Remove or tightly secure awnings |
| Emergency Measures | Pack evacuation kit, seek shelter | Monitor weather, secure loose items |
Additional Safety Measures To Secure A Caravan In A Cyclone Or High Winds
- Stay Informed: Regularly check weather updates from reliable sources like the Bureau of Meteorology. A good old battery powered radio can be a great piece of gear to keep up to date with what’s happening. Your battery powered radio doesn’t rely on an external power source or internet connection.
- Follow Local Guidelines: Adhere to campsite regulations and evacuation policies.
- Emergency Kit: Include warm clothes, essential medications, and emergency supplies.
- Insurance: Ensure your caravan insurance policy covers cyclone and wind damage. Review your policy regularly to ensure adequate coverage.
Long Term Preparations
While immediate actions are crucial, long term preparations can also help protect your caravan. Consider buying a cyclone rated tie down kit. They’re designed specifically to withstand extreme weather conditions. Regularly inspect your caravan’s structural integrity, paying special attention to the roof, chassis, and anchor points.
If you frequently travel to cyclone prone areas consider upgrading to a caravan with reinforced construction.
Conclusion To This Article On How To Secure A Caravan In A Cyclone Or High Wind
Securing your caravan during cyclones or high winds requires careful planning and proactive measures. By following these steps, you can significantly reduce the risk of damage and ensure the safety of your caravan and its contents. Always stay informed, prioritise safety, and be prepared to act quickly in the face of severe weather.
For more detailed information, refer to resources like the Bureau of Meteorology and SecureNT.
How To Secure A Caravan In A Cyclone