Millard Caravans Review: Iconic Aussie Caravans
Millard Caravans Review: Iconic Aussie Caravans
Looking for a durable and practical caravan? Read our Millard Caravans Review for insights on their impressive range. Millard Caravans is a well known name in the Australian caravan market, synonymous with durability, functionality and timeless craftsmanship. Since its establishment in the 1940s the Millard brand has evolved to cater to the needs of modern caravanning while maintaining its reputation for quality and reliability.
This Millard Caravans Review explores the range, highlighting the features and options that make these caravans a popular choice for Australians. Read the Millard caravans review below to find out more.
Table Of Contents
- 1. The Classic Range: Nostalgia Meets Practicality
- 2. The Toura Range: Versatile and Reliable
- 3. The Breakaway Range: Compact Adventure Machines
- 4. Durability and Build Quality: A Core Strength Of This Millard Caravans Review
- 5. Modern Interiors with a Touch of Tradition
- 6. Off-Road Capabilities: Designed for Adventure
- 7. Customisation Options: Tailored to Your Needs
- 8. Affordability And Value for Money – Millard Caravans Review
- 9. Customer Feedback and Reviews
- 10. Ideal for Australian Travellers
- Tips for Choosing the Right Millard Caravan
- Final Thoughts On This This Millard Caravans Review
- List Of Australian Caravan Brands
1. The Classic Range: Nostalgia Meets Practicality
The Classic range by Millard is designed for those who prefer a simple yet functional layout. These caravans embrace the simplicity of traditional caravan design while incorporating modern conveniences.
Key Features:
- Lightweight aluminium frame construction for ease of towing.
- Simple floor plans offering ample space for living and storage.
- Energy efficient LED lighting throughout.
The Classic range is ideal for retirees or couples looking for an affordable, no fuss caravan that delivers everything needed for a comfortable journey.
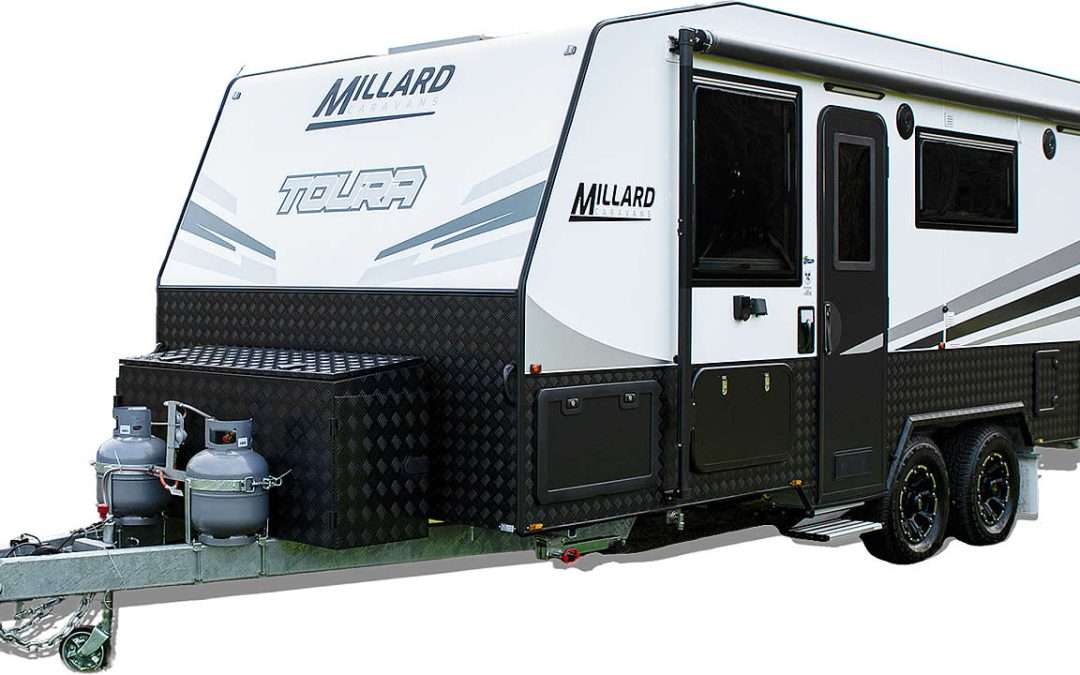
2. The Toura Range: Versatile and Reliable
For travellers who love exploring regional towns and coastal areas, the Toura range offers a perfect balance of versatility and reliability.
Key Features:
- Aerodynamic design for fuel efficiency.
- Customisable floor plans, including family friendly options with bunk beds.
- Fully equipped kitchens with high quality appliances.
The Toura range caters to families and solo adventurers alike, ensuring a comfortable experience whether you’re on a weekend getaway or an extended trip.
3. The Breakaway Range: Compact Adventure Machines
The Breakaway range focuses on compact, lightweight caravans designed for easy towing and manoeuvrability.
Key Features:
- Smaller dimensions suitable for first time caravanners or compact vehicles.
- Off-road capabilities, including reinforced suspension and chassis.
- Foldaway features to maximise interior space.
This range is perfect for adventurers seeking a minimalist, fuss free option that doesn’t compromise on quality or comfort.
4. Durability and Build Quality: A Core Strength Of This Millard Caravans Review
Millard caravans are built with durability in mind, ensuring they withstand the diverse and often challenging conditions of Australian travel.
Materials and Construction:
- Aluminium frames for strength without excess weight.
- Bonded panel walls for superior insulation and weather resistance.
- Galvanised steel chassis to handle tough terrain.
Real World Performance:
Owners frequently praise Millard caravans for their resilience on long haul trips, whether navigating dirt roads in the outback or tackling windy coastal highways.
5. Modern Interiors with a Touch of Tradition
Millard caravans blend classic designs with modern comforts, making them appealing to both seasoned travellers and younger families.
Interior Highlights:
- Stylish yet practical layouts with a focus on functionality.
- Comfortable seating and bedding options for restful nights.
- Clever storage solutions to keep clutter at bay.
While the interiors aren’t overly luxurious, they prioritise durability and practicality, which is essential for Australian conditions.
6. Off-Road Capabilities: Designed for Adventure
Millard offers off-road variants across its range, catering to travellers who love exploring Australia’s rugged landscapes.
Off-Road Features:
- Independent suspension systems for improved handling on uneven terrain.
- Raised ground clearance to navigate rocks and ruts.
- Off-road tyres and reinforced chassis for added robustness.
Whether you’re planning a trip to the Kimberley or the Simpson Desert, Millard’s off-road models are built to handle the journey.
7. Customisation Options: Tailored to Your Needs
One of Millard’s standout features is its commitment to customisation. Buyers can choose from a variety of floor plans, finishes and additional features to create a caravan that suits their lifestyle.
Popular Customisations:
- Solar panel systems for off-grid camping.
- Ensuite layouts with showers and toilets.
- Upgraded kitchen appliances for culinary enthusiasts.
This flexibility ensures that every Millard caravan feels personal and tailored to its owner’s unique travel preferences.
8. Affordability And Value for Money – Millard Caravans Review
While Millard caravans are not the cheapest on the market, they offer excellent value for money given their quality and durability.
Pricing Overview:
- The Classic range starts at a budget friendly price point.
- Premium off-road models are competitively priced within their segment.
For buyers seeking a long lasting investment, Millard’s reputation for reliability means fewer maintenance costs over the caravan’s lifespan.
9. Customer Feedback and Reviews
Millard caravans receive generally positive reviews from owners, with many praising their build quality and reliability.
Pros Mentioned by Owners:
- Easy to tow, even for first time caravan owners.
- Low maintenance requirements.
- Exceptional after sales service and support.
Common Criticisms:
- Some models could benefit from more luxurious interior finishes.
- Limited advanced tech features compared to newer competitors.
These insights highlight Millard’s focus on functionality and durability over high tech gadgets or luxury aesthetics.
10. Ideal for Australian Travellers
Millard caravans are designed with Australian travellers in mind, making them a popular choice for exploring the country’s vast and varied landscapes.
Why Choose Millard?
- Their caravans are built to handle the harsh Australian climate.
- Compact options suit urban drivers, while larger models cater to extended family trips.
- Customisation options allow buyers to adapt their caravan to specific needs.
Tips for Choosing the Right Millard Caravan
When considering a Millard caravan, keep the following factors in mind to ensure you choose the best model for your adventures:
- Determine Your Travel Style
Consider whether you’ll mostly be travelling on sealed roads or venturing off-road. Choose a model with the appropriate suspension and features. - Assess Space Requirements
Think about the number of people travelling and the storage space needed. Families may benefit from bunk beds, while couples can opt for a streamlined layout. - Plan for Power Needs
If you enjoy off-grid camping, look for models with solar panel systems or add this feature during customisation. - Consider Towing Capacity
Match the caravan’s weight to your vehicle’s towing capacity to ensure safe and efficient travel.
Final Thoughts On This This Millard Caravans Review
Millard caravans are a testament to quality Australian craftsmanship. They have a versatile range of options for caravan owners seeking reliable and functional caravans. This Millard Caravans Review highlights their commitment to durability, practicality and customisation, making them a solid choice for anyone exploring Australia’s great outdoors.
Whether you’re a seasoned adventurer or embarking on your first caravan journey, Millard’s range ensures there’s something for everyone. With a focus on robust design and practical features, these caravans are built to accompany you on countless memorable trips across Australia.
Here is our full list of Caravan Reviews Top Picks For Every Aussie Traveller.
List Of Australian Caravan Brands
Adventura Caravans, Adventure Caravans, Aliner Caravans, Alpha Fibreglass, AOR (Australian Off Road Caravans), Apollo Caravans, Aussie Wide Caravans, Australian Motor Homes Pty Ltd, Australian Off Road Caravans, Avan Campers, Avan Caravans, Avida RV, Bailey Caravans, Ballina Campervans, Beachmere Caravans, Big Red Caravan Co., Billabong Custom Caravans, Black Series Caravans, Broadwater Caravans, Bushtracker Caravans, Camprite Campers, Caravan Manufacturer, Caria Caravan Trailer, Challenge Camper Trailers Caravans, Chapman Caravans, Classic RTM Caravans, Concept Caravans, Coromal Caravans, Creative Caravans, Crusader Caravans, Customline Caravans, Davsher Caravans, Desert Edge Trailers, Designer Vans Caravans, Discoverer Campers, Dreamhaven Caravans, Dreamland Trailers, Driftaway Caravans, Dryden Trailers Caravans, Eagle Caravans, Elddis Caravans, Elross Caravans, Emerald Caravans, Evernew Caravans, Exodus Campers, Ezytrail Campers, Ezytrail Caravans, Galaxy Caravans, Goldstream Recreational Vehicles, Goldstream RV, Golf Caravans, Grand Tourer Caravans, Heaslip Campers, Horizon Motorhomes, I & D Industries, Imperial Caravans, Jayco, Jayco Caravans, Jurgens Australia, Jurgens Caravans, Kea Campers Australia Caravans, Kingdom Caravans, Knaus Caravans, La Vista Caravans, Lifestyle Leisure RV, Limit Seeker Camper Trailers Caravans, Lotus Caravans, Majestic Caravans, Mandurah Caravans, MARS Campers, MARS Caravans, May West Caravans, Melbourne RV, Metro Caravans, Millard Caravans, Montana Caravans, New Age Caravans, Nova Caravans, Olympic Caravans, Opalite Caravans, Outback Caravans, Paradise Caravans, Paradise Motor Homes, Paramount Caravans, Regal Caravans, Regent Caravans, Retreat Caravans, Rhinomax, Rivenlee Caravans, Roadstar Caravans, Roma Caravans, Royal Flair Caravans, Shasta Caravans, Snowy River Caravans, Spaceland Industries Caravans, Spinifex Caravans, Suncamper Caravans, Sunland Caravans, Sunliner Recreational Vehicles, Supreme Caravans, Swagman Aust Caravans, Toy Haulers Manufacturer, Track Trailer, Trackabout Caravan Co., Trailblazer Caravans, Trailblazers RV Caravans, Trailer Manufacturer, Trailstar Caravans, Trakka, Trakka Caravans, Trakmaster Caravans, Travelhome, Traveller Caravans, Truelux 5th Wheel, Universal Caravans, Vanguard Caravans, Victory Caravans, Western Caravans, Windsor Caravans, Winnebago Industries, Wirraway Motorhomes, Zone RV